
Scalper Inside Pro (v6.5 and Above) – Mastering Intraday Scalping – Trading Strategies – 6 September 2024
[ad_1] Scalper Inside Pro – Mastering Intraday Scalping Product URL: https://www.mql5.com/en/market/product/53124 Current Version: v6.6 Trading Instruments: Any Working Timeframe: Any (M5 recommended) Trading Platform: MetaTrader 4 Brokers for Trading: Read More… Link to the Complete and Updated Article: Read More… Scalper Inside Pro is an exclusive indicator from MAFX Solutions that uses an innovative algorithm to quickly and accurately identify market
 – Mastering Intraday Scalping – Trading Strategies – 6 September 2024")
[ad_1]

Scalper Inside Pro – Mastering Intraday Scalping

Product URL: https://www.mql5.com/en/market/product/53124
Current Version: v6.6
Trading Instruments: Any
Working Timeframe: Any (M5 recommended)
Trading Platform: MetaTrader 4
Brokers for Trading: Read More…
Link to the Complete and Updated Article: Read More…

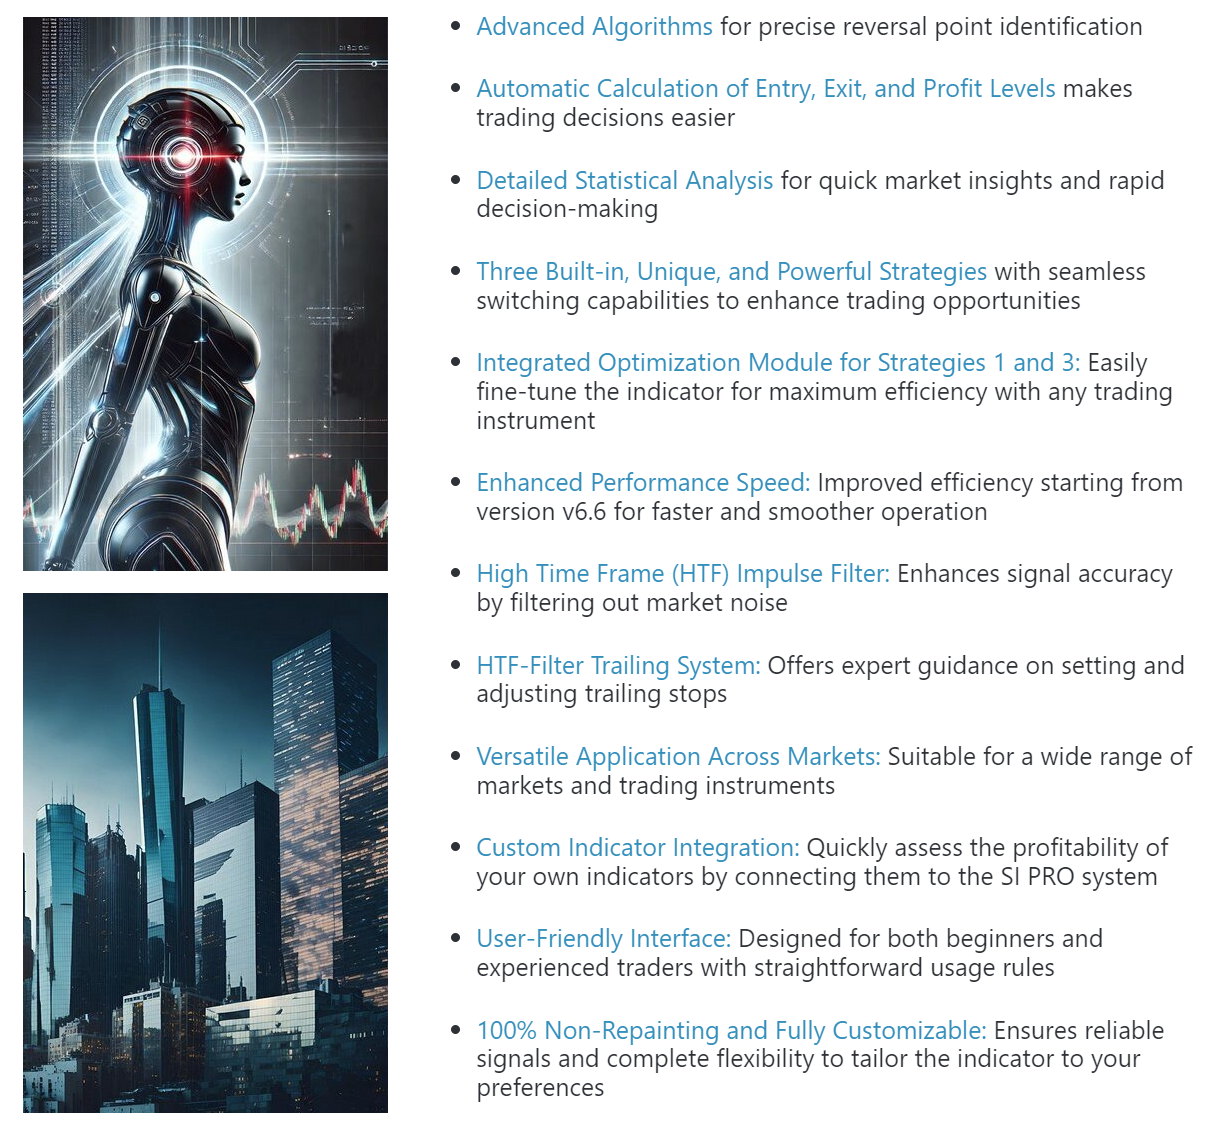
Scalper Inside Pro is an exclusive indicator from MAFX Solutions that uses an innovative algorithm to quickly and accurately identify market trends. The indicator automatically calculates the timing, entry levels, and targets for each position, while also providing detailed trading statistics and numerous other features to help traders make accurate and timely decisions. Thanks to these functions, you can select the most suitable trading instrument according to the current market conditions. Additionally, you can easily integrate your own arrow indicators into Scalper Inside Pro to quickly assess their statistics and profitability.
The very first version of the indicator was released back in 2020 – on August 20th, to be exact. Since then, the indicator has seen continuous development and enhancement: new features have been added to provide better functionality, the code has been refined for improved performance, minor issues have been resolved, and the overall optimization has been significantly improved. Now, we are excited to present to you the updated lineup (starting from version 6.5), which represents a huge leap forward compared to the earlier versions. With this new version, we’ve implemented advanced optimization modules, more intuitive controls, and a more streamlined user experience to make your trading more efficient and profitable.
It’s been a long journey, and we are grateful to all our friends and clients for their support, advice, and feedback. Your input has been invaluable in helping us refine the indicator into what it is today, and we look forward to continuing this journey of growth and innovation together.


UPDATE NOW

Scalper Inside Pro in Action – Your Ultimate Trading Companion (Youtube):

Features of Scalper Inside Pro v6.6 and Above
Version v6.6 of the Scalper Inside Pro indicator has seen significant improvements over previous versions. This update represents a substantial leap in code modernization and optimization, which not only enhances the performance of all indicator modules but also boosts overall efficiency. As a result, the indicator now delivers faster, more reliable results, even when applied across multiple financial assets simultaneously. The v6.6 upgrade reflects a commitment to excellence, ensuring that traders benefit from a more powerful and versatile tool in their trading arsenal.

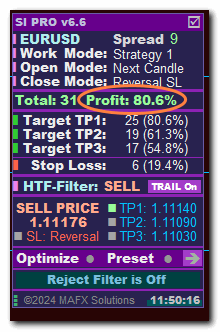
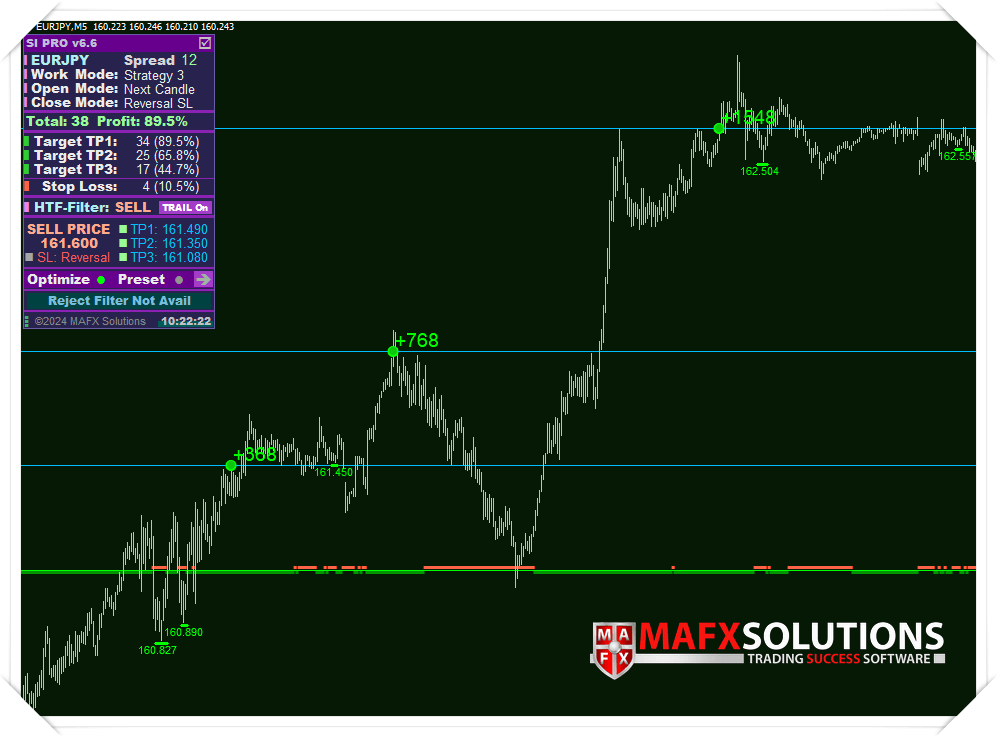
Overview of the Indicator Control Panel
The appearance of the Scalper Inside Pro control panel (starting from version v6.5 and above) is shown in the image below. There you will also find a description of all the elements of the control panel:
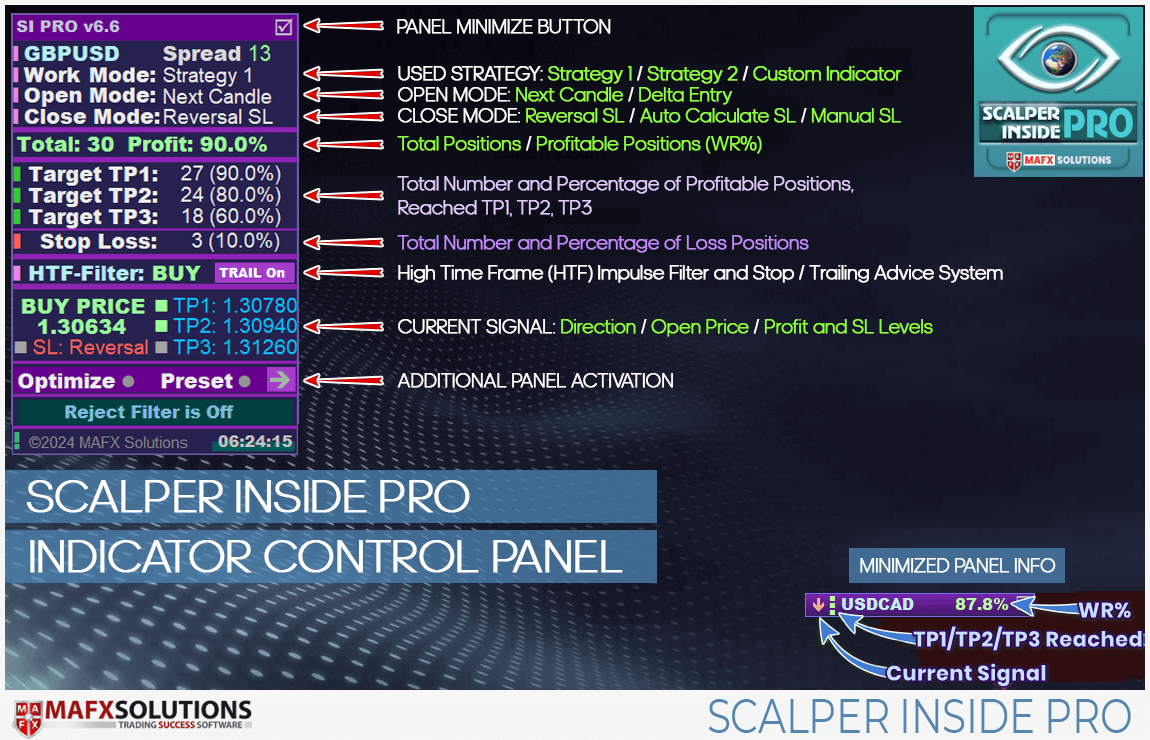
The activation button for the additional panel works only in real-time and does not function in the tester. It opens an extended panel for managing the indicator’s optimization module and saving presets.
Move and Hide the Scalper Inside Pro Info Panel
You can minimize and move the Scalper Inside Pro control panel across the price chart. To move the panel, double-click on the control panel, then drag it to the desired location. After that, double-click the panel again, and the indicator will remember the new position of the control panel.
Control Panel Extended Mode
The Extended Mode of the Control Panel provides access to additional features of the Scalper Inside Pro indicator, such as the built-in optimization module for strategies 1 and 3.
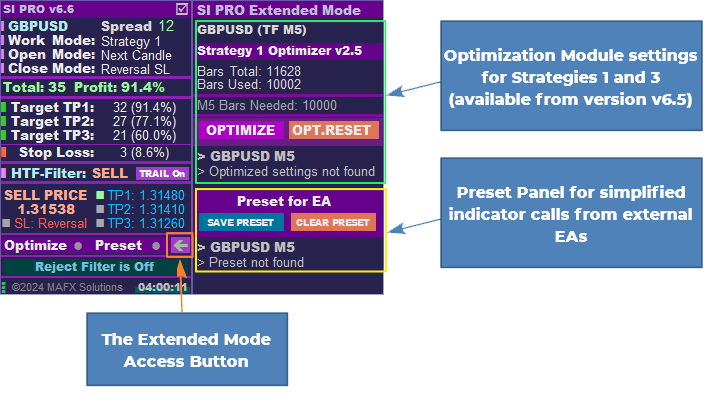
The extended mode panel opens and collapses when you click the arrow button (as marked in the image above).
Read more about the simplified indicator call from external EAs here

Easy-to-Use Rules for Scalper Inside Pro
Before we move on to describing the initial setup of the Scalper Inside Pro indicator (version v6.6 and above) and its settings, let’s first review the general functioning principles of the indicator and the basic rules for working with it.

UPDATE NOW

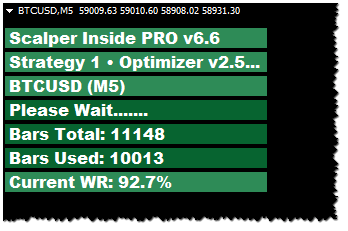
To begin with, choose financial assets with the highest possible WR% (75-80% or higher) for analysis:
Since the Scalper Inside Pro indicator is trend-based, try to choose financial assets with high volatility for trading, and use the main trading sessions (New York, London) as your working hours.
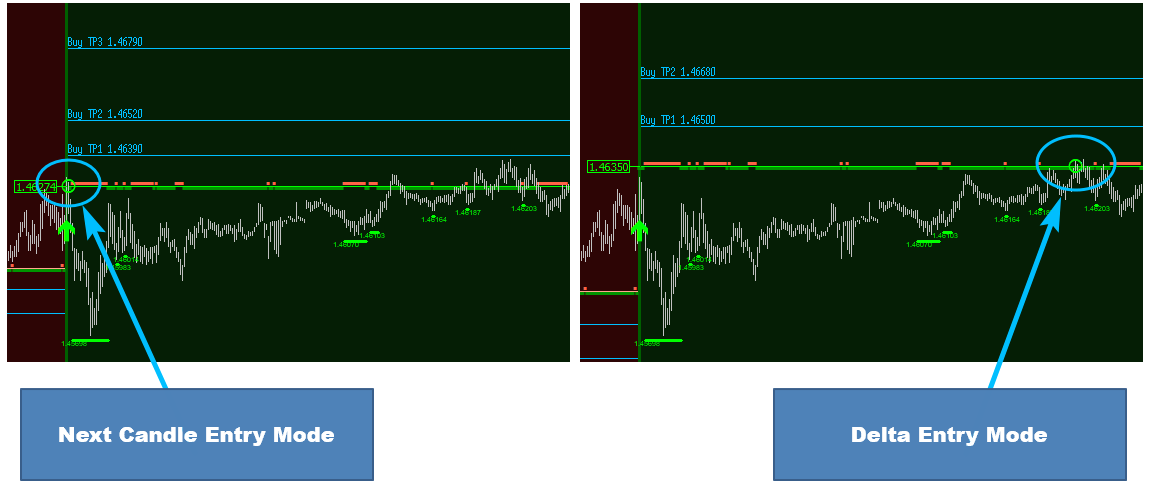
We have two possible entry modes for opening a position: Next Candle Entry Mode and Delta Entry Mode. Let’s explore the differences between these modes.
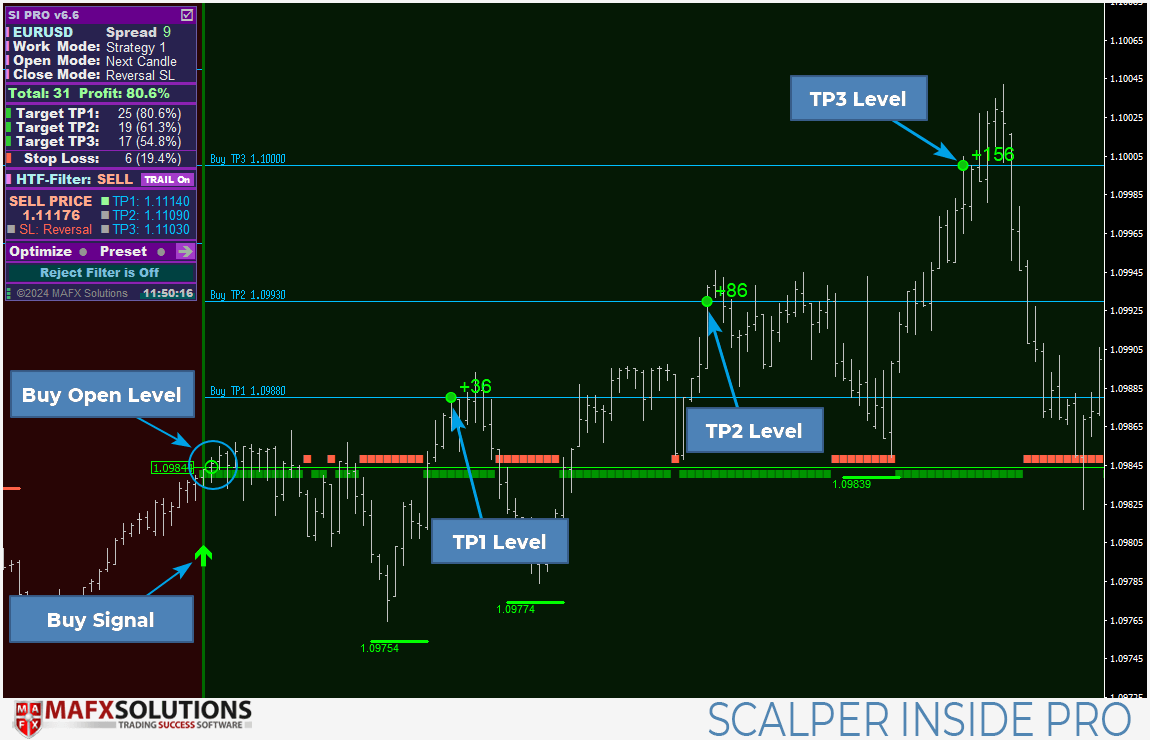
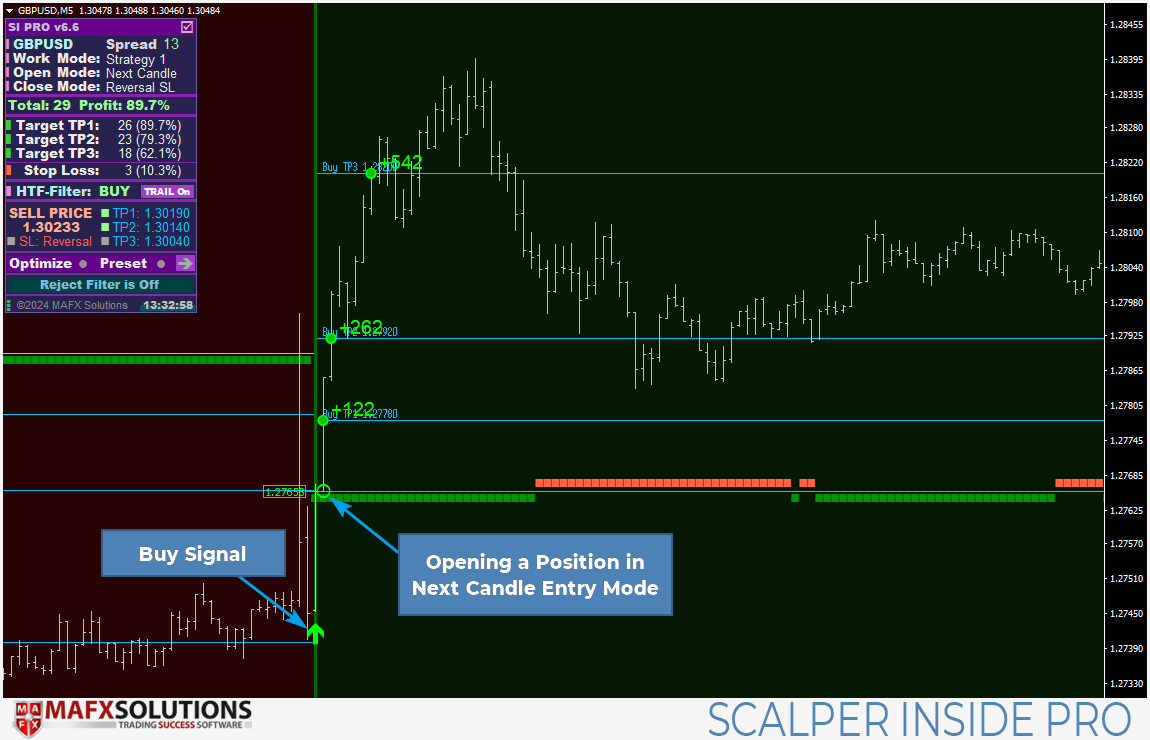
Opening Positions in Next Candle Entry Mode
Next Candle Entry mode works well with trending instruments and markets. In this mode, a position is opened immediately on the next bar after the Arrow signal. The primary objective of this entry mode is to enter the market as quickly as possible.
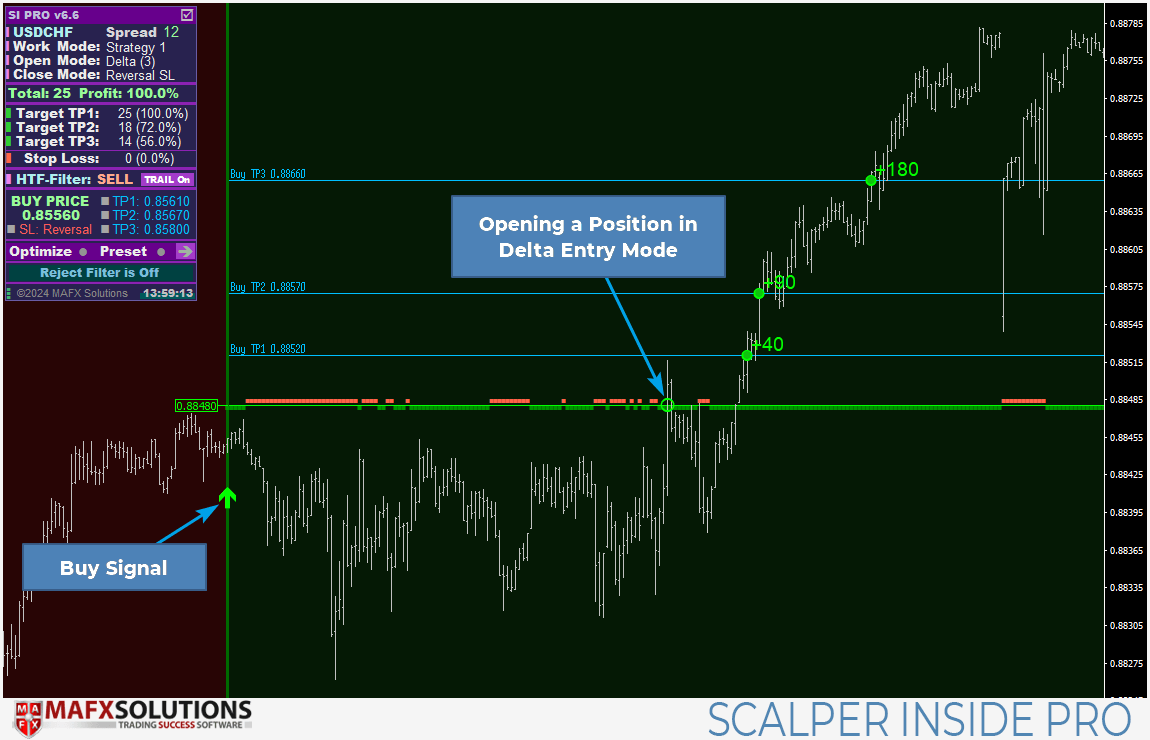
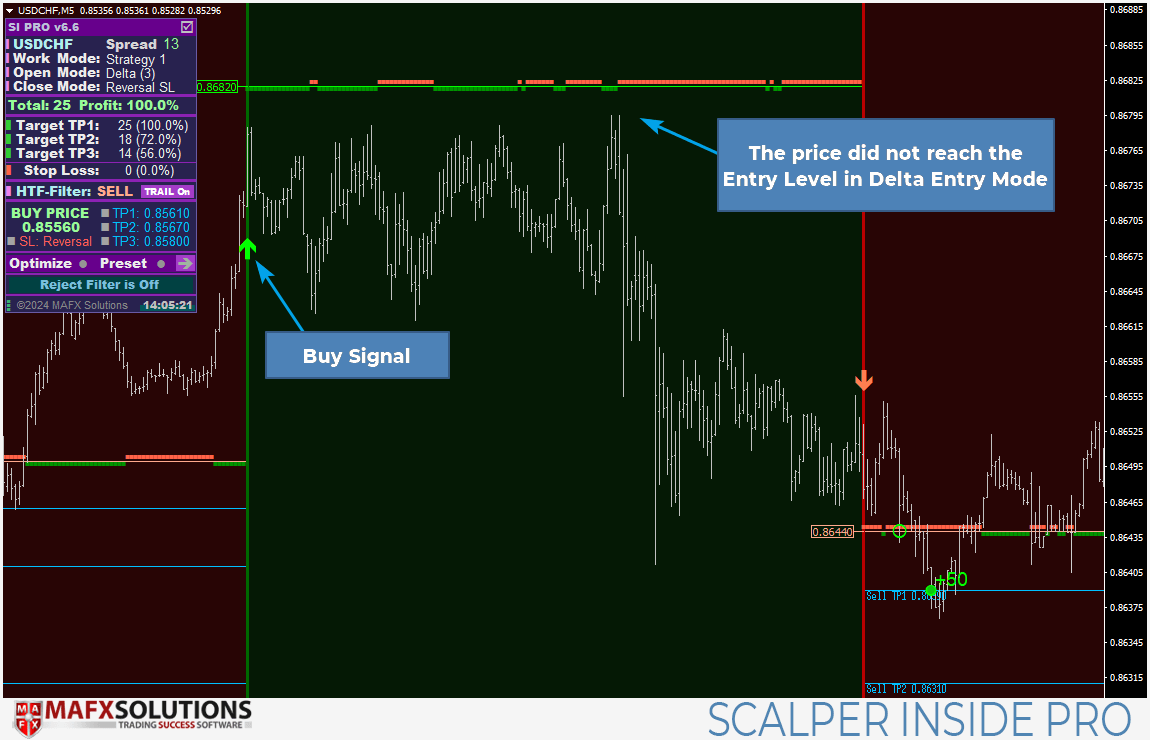
Opening Positions in Delta Entry Mode
Delta Entry mode works best in a ranging market or with less volatile trading instruments. In this mode, after a signal appears, we wait for the price to reach a certain level before entering a position. This can be done with either a market order or a pending order. The signal is considered invalidated if an opposite signal appears or if the price has passed a certain number of bars. Therefore, in a ranging market, this mode helps prevent positions from being opened on minor price movements or retracements from the main trend.
In the following example, we avoided opening a Buy position thanks to Delta Entry mode. We received a Buy signal, but the price did not reach the entry level:
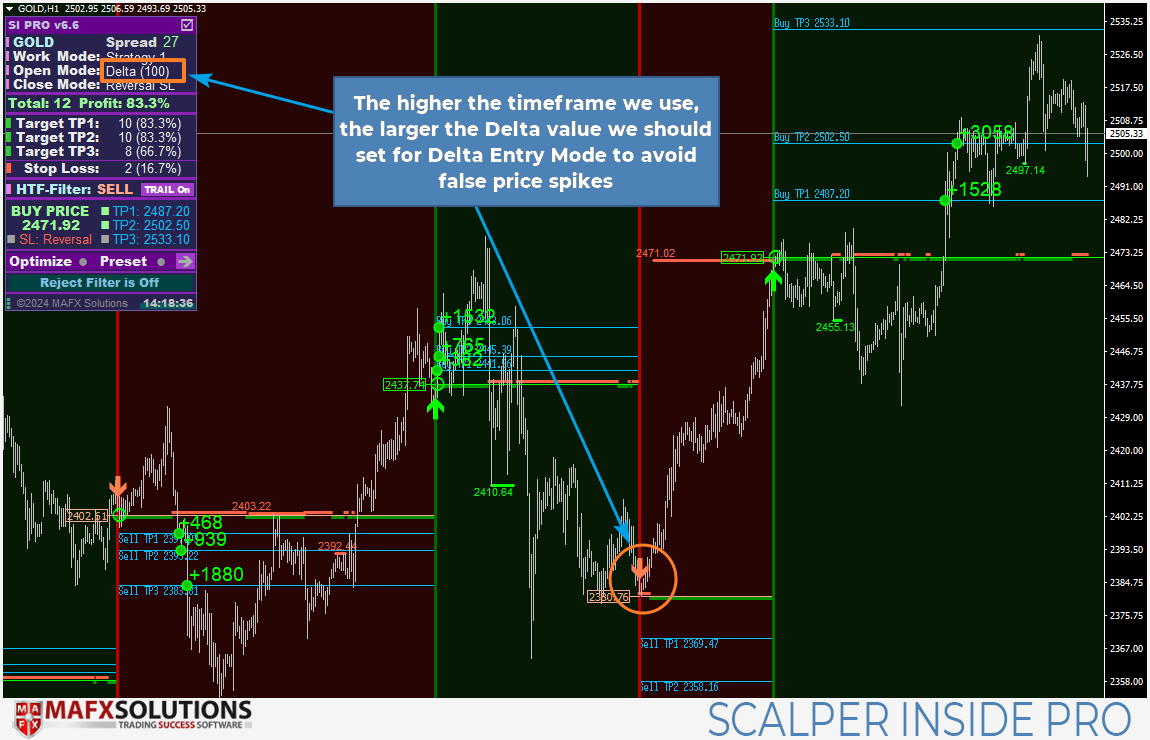
As a rule, the higher the timeframe we use for trading, the larger the Delta value we should set for Delta Entry Mode to avoid false price spikes that could trigger our entry level and then reverse.

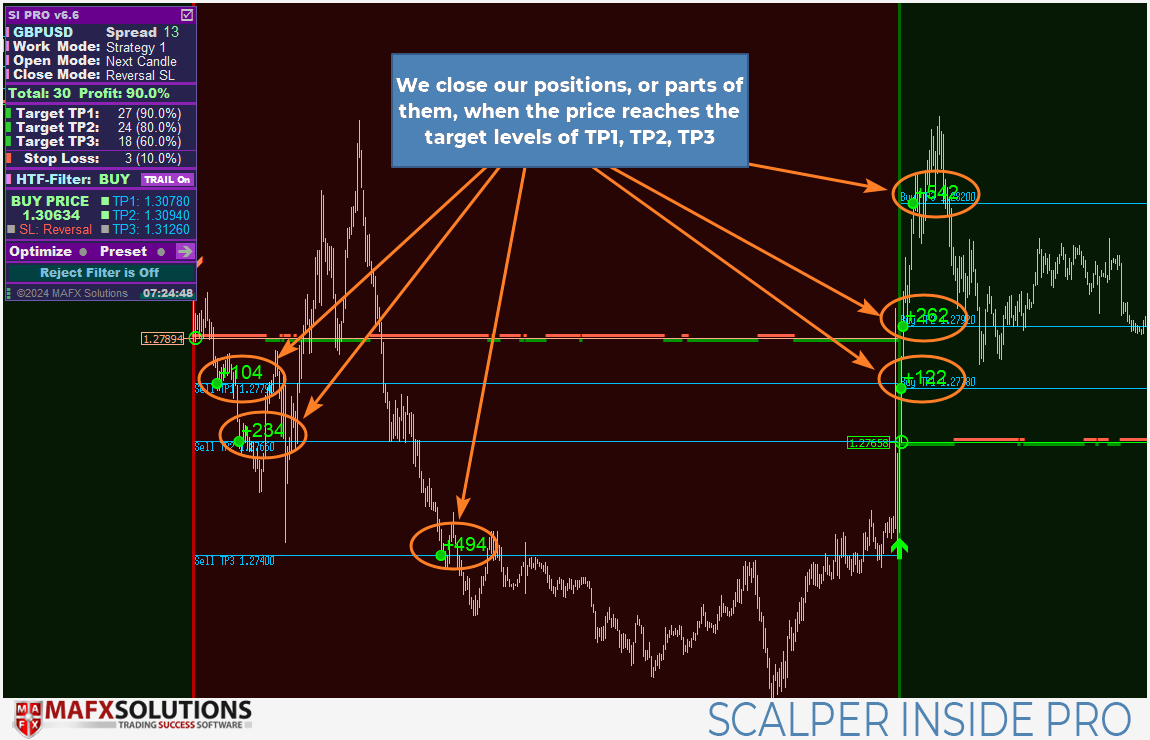
How to Close Positions
Depending on your trading strategy, open positions, or parts of them, are closed when the price reaches the target levels of TP1, TP2, TP3.
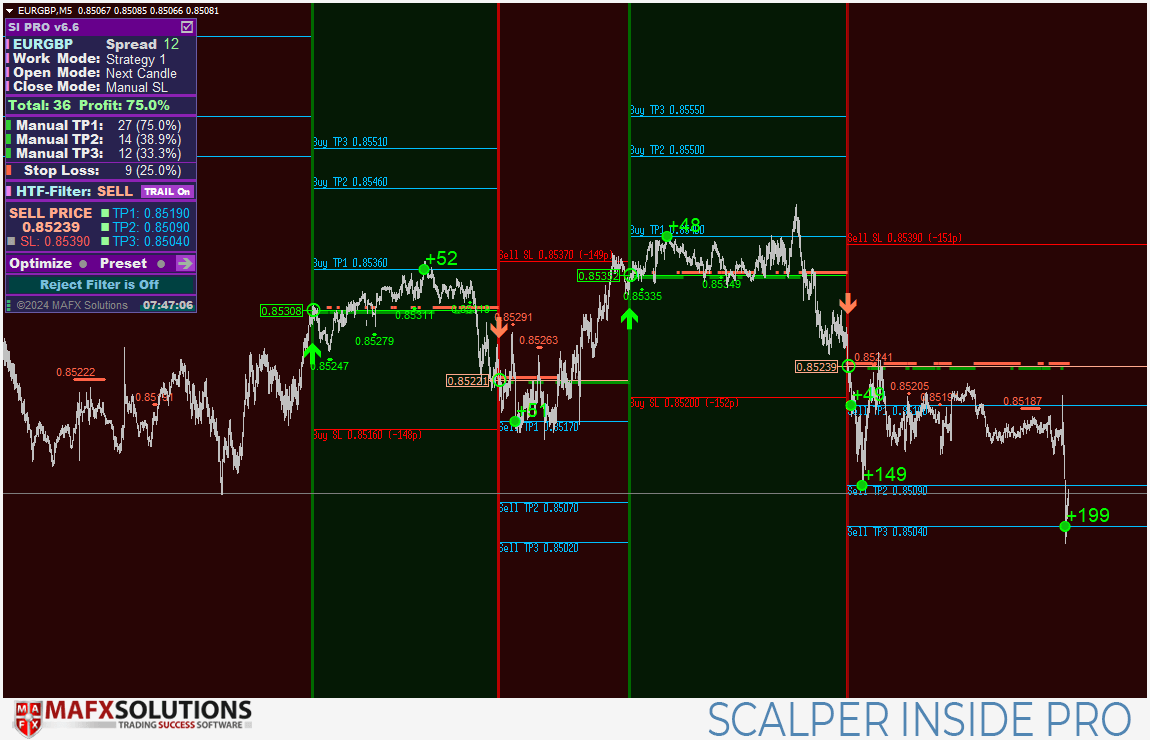
If the price has not reached our expected profit levels, we close the position based on the opposite (reversal) signal, regardless of the profit (closing the position in Reversal Mode):

If you use manual settings for the Stop Loss level, the previously mentioned options for closing positions will also include the potential triggering of stops at the Stop Loss level.
By the way, thanks to the ability to manually set TP1-TP3 and Stop Loss levels in the Scalper Inside Pro indicator, you can develop your own trading strategies and quickly test theories on how different Stop Loss values or profit levels would perform. Moreover, you can do this with your custom indicators as well. For more details on connecting custom indicators to the Scalper Inside Pro system, you can read here.

First Launch of the Indicator
When launching the Scalper Inside Pro indicator for the first time, especially on a new (freshly installed) terminal, it is crucial to have a sufficient amount of historical data for accurate calculations.
We recommend having a history of around 10,000 bars for the M5 timeframe for calculations. This is not a strict requirement, especially considering that for some financial assets (e.g., certain stocks), the depth of history stored by the broker may be less than 10,000 bars. Starting from version v6.5 of the Scalper Inside Pro indicator, we have implemented a check for both the minimum required and recommended depth of historical data to avoid calculation errors. However, you can disable the recommended bar count check in the indicator settings. If you wish to disable this check, set the ‘Use Historical Data Check‘ variable to false.
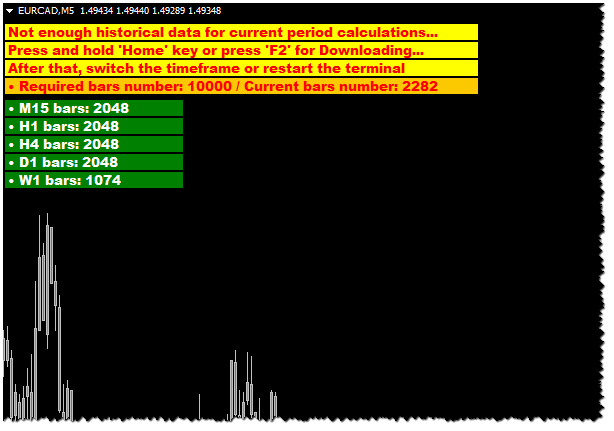
As a result, if there is insufficient historical data and the historical data check option is activated, when starting the Scalper Inside Pro indicator, we will receive the following message:
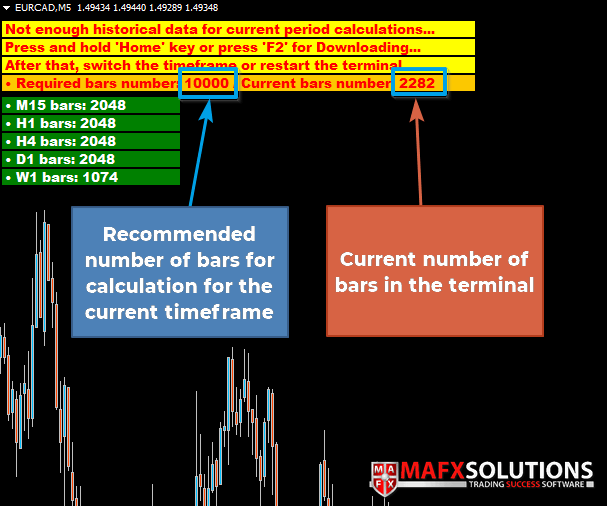
When launched, the indicator will attempt to load additional data from all timeframes, but if the data is insufficient, the indicator will display the current number of bars and the recommended number of bars.
There are two ways to update the historical data:
1 – Through the terminal’s History Center (accessible via the ‘F2’ hotkey)
2 – By pressing and holding the ‘Home’ key on your keyboard. You will see the number of available bars increase in real-time. Once the required number of bars is reached, switch the timeframe and then switch back to refresh the indicator calculations
For more details on the initial launch of the indicator and loading of missing historical data, please refer to the following tutorial video:
A Simple Way to Download Historical Data for Scalper Inside Pro from v6.5 (Youtube):

In general, we recommend restarting the terminal after using either method for more accurate loading of historical data and subsequent calculations.
If, for some reason, you are unable to load historical data using the ‘Home’ button (second method), please use the History Center.
This function is also automatically disabled when custom indicators are connected to Scalper Inside Pro, as it is up to the user to decide which indicator to connect and how many bars to use for the calculation.
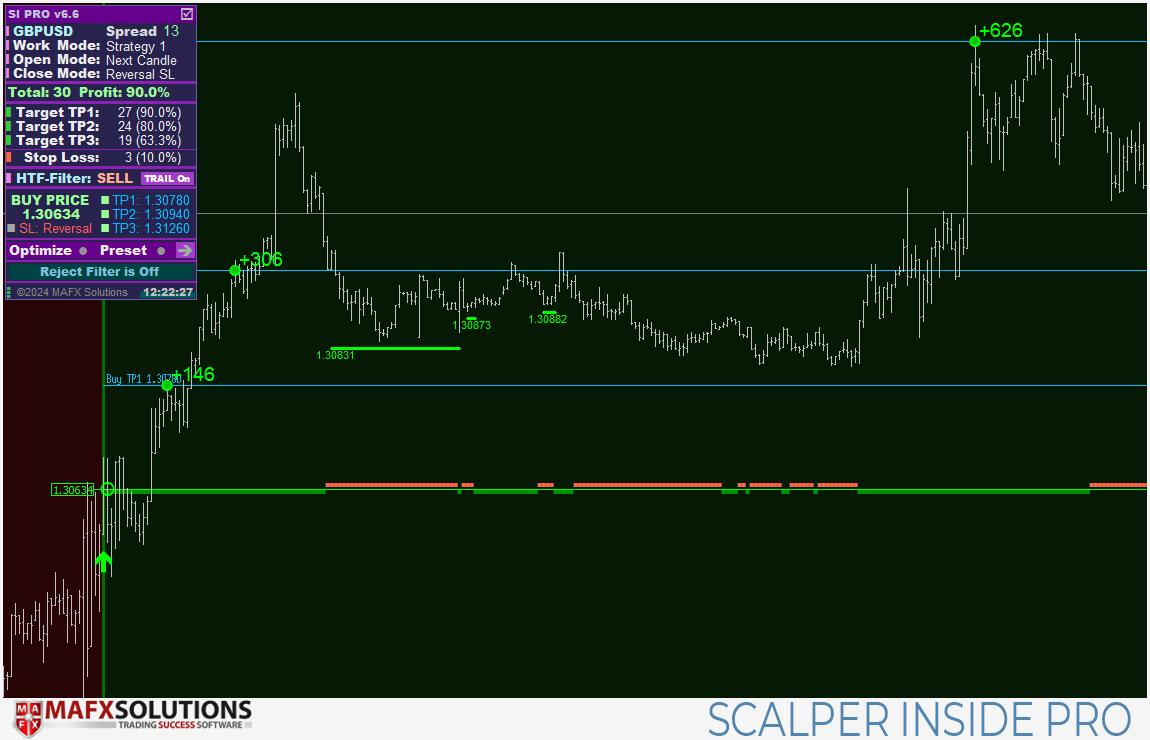
Don’t be intimidated by the seeming complexity of the process, as you only need to load the missing data once. After that, when you start the indicator, you won’t need to do it again. Once all the data is loaded and the indicator is launched, you will see the desired result – indicator signals and the calculation of statistics for the current financial asset:

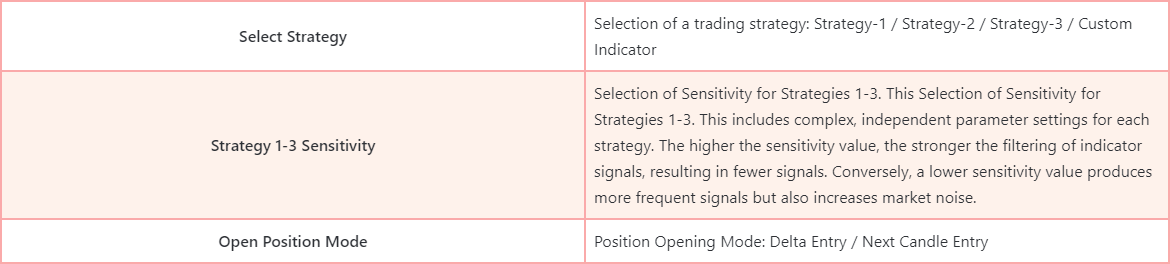
Adjusting Indicator Sensitivity for Strategies 1-3
The Scalper Inside Pro indicator is a complex trading tool that contains numerous algorithms designed to perform calculations, filtering, and other data processing tasks to provide the user with the clearest possible picture of market analysis, consisting of signals and statistical data.
Despite the overall complexity of the internal processes, the Scalper Inside Pro indicator has managed to limit the significant settings to just one variable – ‘Strategy 1-3 Sensitivity‘. For each strategy in the indicator, adjusting this setting activates different types of algorithms and calculation methods internally. As a result, the trader doesn’t need to worry about what exactly needs to be adjusted for Strategy 1 or Strategy 3. Simply changing one parameter is sufficient – everything else is already built into the Scalper Inside Pro indicator.

UPDATE NOW

You might ask, what to do if you are using multiple financial assets simultaneously? After all, going through various sensitivity settings in such a case can take quite a long time. Additionally, it’s important to remember that market price movements consist of different phases, and these phases change from time to time. For example, for several months, the price of one financial asset may move in prolonged trends, and then the trend may be replaced by a prolonged flat period. And if you are using multiple financial assets, you need some time to adjust the settings to the current market phase.
So, how to handle this situation, and can these processes be simplified? The answer is – yes! Thanks to our exclusively developed built-in optimization module for Strategies 1 and 3. And now, starting from version v6.5, optimization for both Strategy 1 and Strategy 3 is available to you. All of this is already built into the indicator and does not require complex setup.
And a few words about Strategy 3 itself. We took this module from one of our larger systems for MT5 and adapted it for MT4. This doesn’t mean you should shift all your focus to this module, as Strategies 1 and 2 also work well. However, Strategy 3 is indeed very powerful, and its main challenge has been its relatively complex configuration. Although, on the surface, Strategy 3, like Strategies 1 and 2, appears to have just one key setting, internally, it works in a much more intricate way. This is why we avoided integrating this module into the indicator and especially into the built-in optimizer for a long time. But now that we have successfully adapted the built-in optimizer for Strategy 3, using this strategy has become more convenient, and we recommend you give it your attention. Therefore, starting from version 6.5 of the Scalper Inside Pro indicator, configuring and using Strategy 3 has become simpler and more user-friendly.
So, let’s go over everything step by step.

Scalper Inside Pro Built-in Optimization Module
The main purpose of creating the built-in optimization module for strategies 1 and 3 in the Scalper Inside Pro indicator was to simplify and optimize the user experience when working with the indicator, as well as to facilitate and speed up the analysis of financial assets and the selection of the most optimal ones.
For a long time, the optimization module was available only for Strategy 1, but starting from version 6.5, we successfully integrated the optimization module for Strategy 3 as well. This significantly enhanced the capabilities of the indicator when working with different strategies and financial assets.

Let’s see what the optimization module provides and how it can assist a trader in quick analysis. For example, let’s take Strategy 3. Here is how the price chart for Gold (H1) might look when the indicator is first launched:
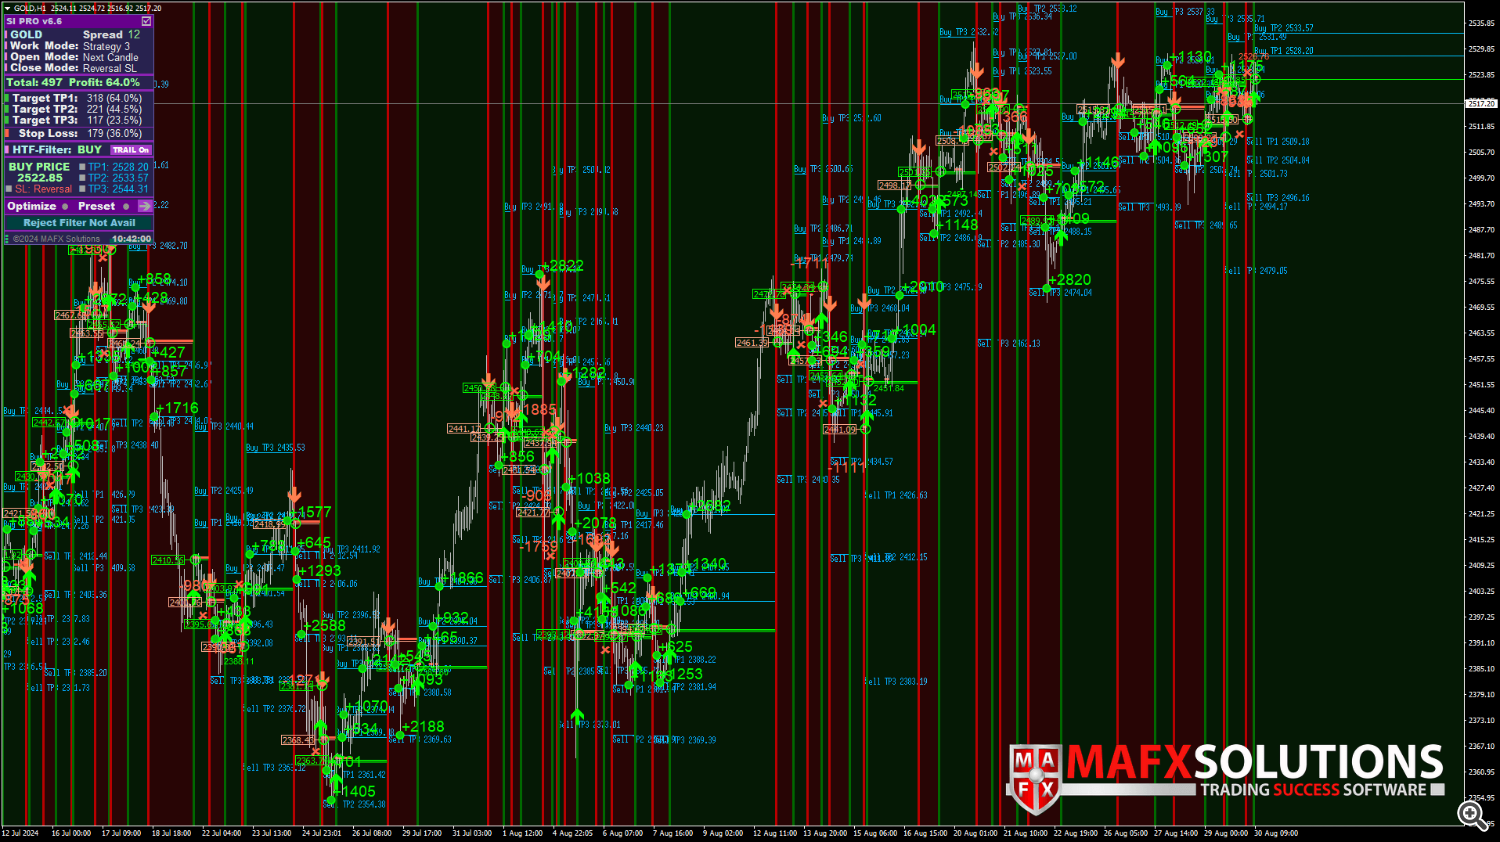
As we can see, upon the initial launch of the indicator, the results look quite chaotic and not very appealing. We have a few options:
-
Discard this financial asset and move on to another, coming back to this one later.
-
Try adjusting the settings manually in search of suitable options.
But there’s another way – using the built-in optimization module, which allows the indicator to automatically select the optimal settings for a given financial asset and timeframe.
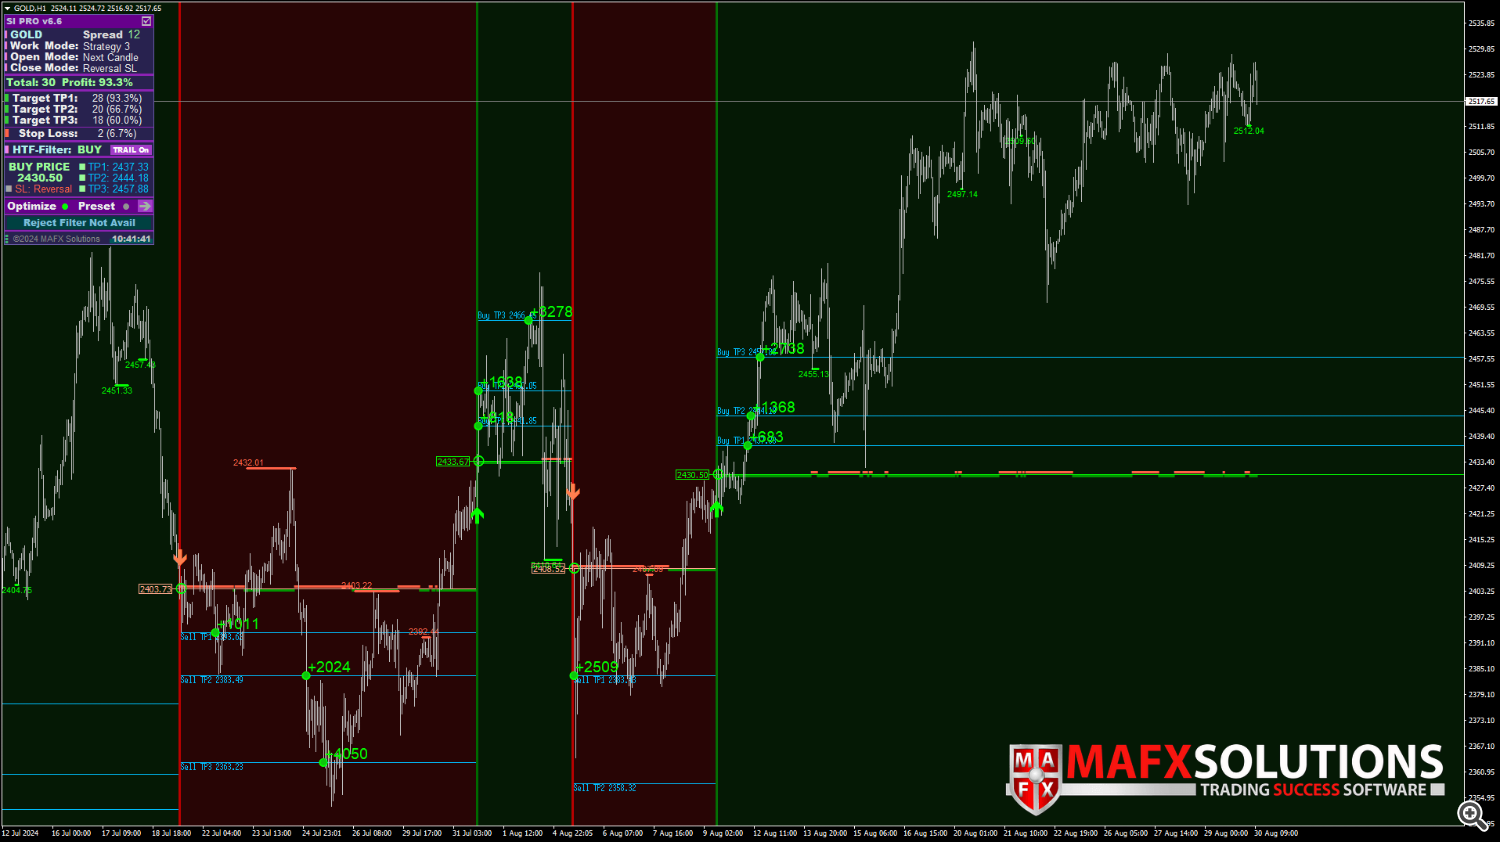
And here is the result we get after optimization – a completely different outcome:

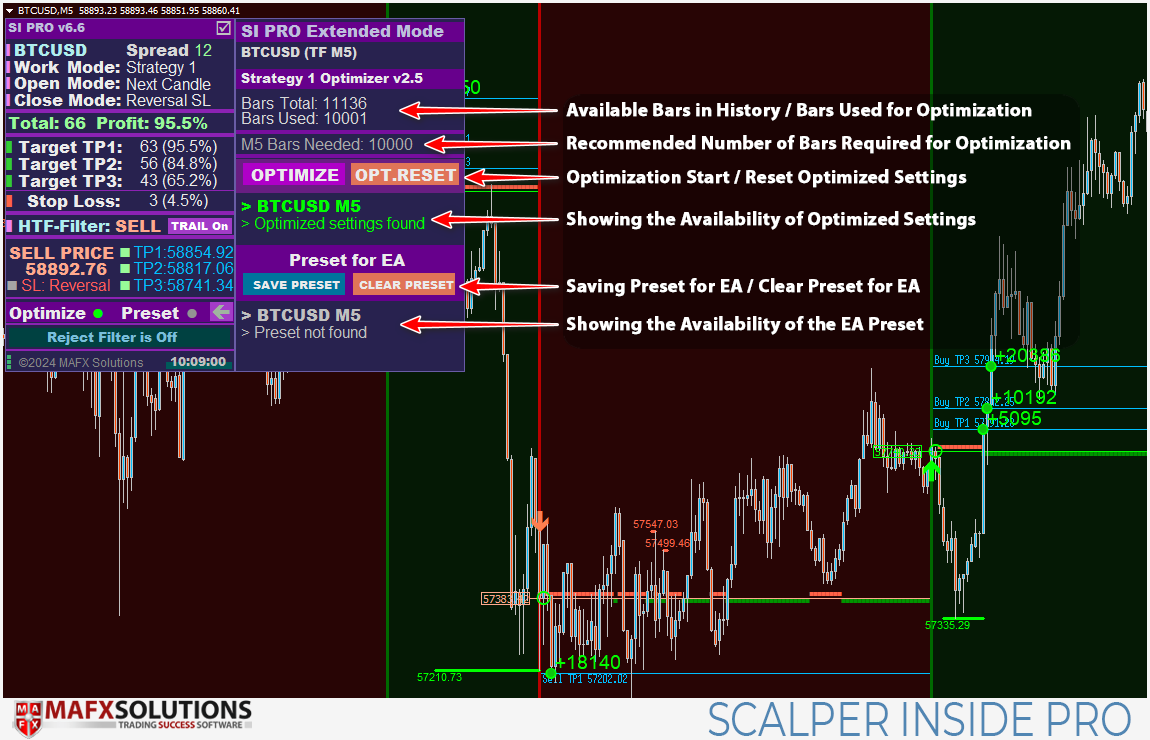
How the Built-in Optimization Module Works in Scalper Inside Pro
1. Click the OPTIMIZE button, and then the automatic optimization of the indicator will begin:
2. Wait for the end of the optimization and do not switch time frames or trading instruments. The optimization process will take some time, after which the indicator will display the result on the chart:
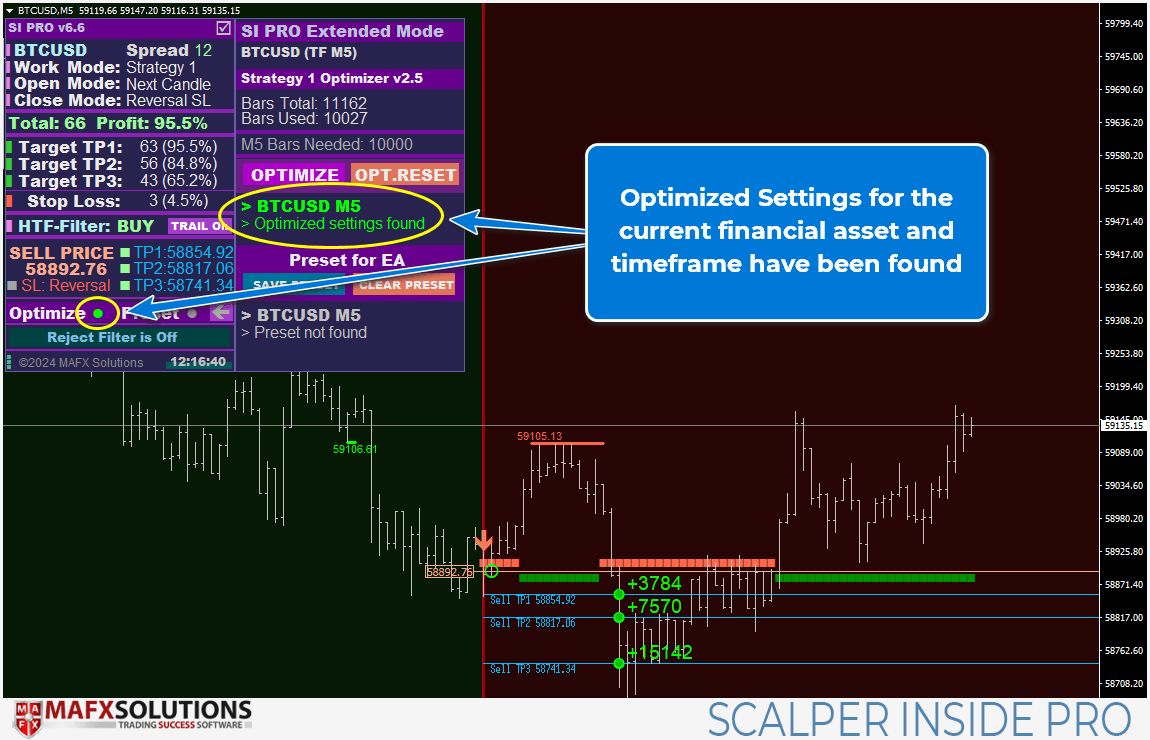
1) If the Optimize indicator is GREEN, the optimized parameters are being used (even after switching timeframes or restarting the terminal)
2) In case you are not satisfied with the optimized parameters, you can press the OPT.RESET key (Optimization Reset) and reset the optimization settings
3) You can also repeat the optimization process (for example, after a week or a month) by pressing the OPTIMIZE button again
Let’s take a look at how the built-in optimization module works in the following video:
How to Use the Scalper Inside Pro’s Built-in Optimization Module (v6.5 and Above) (Youtube):


Settings of the Scalper Inside Pro Indicator
Entry Mode
Earlier, we already considered the difference between both options. In short, Next Candle Entry Mode means opening a position on the next candle after a signal. On the other hand, Delta Entry Mode involves entering at a specific level that is at a certain distance from where the signal appears. This entry distance for Delta Entry Mode is determined by the following setting:
Delta Entry Settings
All of the following graphical settings allow you to turn signals (vertical lines, arrows) on or off and completely change the color scheme.


Service Functions

UPDATE NOW
Use Historical Data Check

We recommend keeping this parameter enabled (‘true’). This function is necessary to ensure there is a sufficient amount of historical data for the indicator’s calculations. The reason for adding this feature is that we often received screenshots of the M5 chart with questions about why there were so few signals, and we noticed that there were only around 2000 bars of historical data. Now, when the indicator is launched, it will show how many bars are needed for accurate calculations.
Here is how this message will look:
There are still two ways to update the historical data.
1 – Through the terminal’s History Center (accessible via the ‘F2’ hotkey):
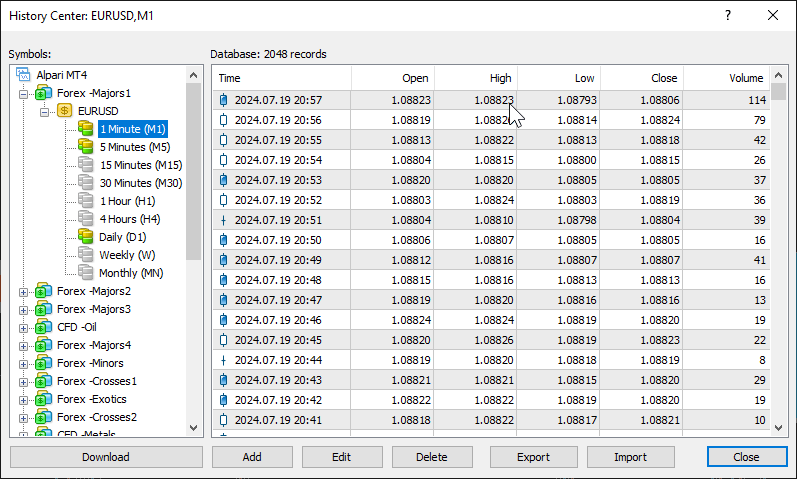
Don’t forget to set up the Charts settings in the terminal settings beforehand:

Max bars in history – This parameter sets the total number of historical data bars that are stored in the file and available for use. You can specify the maximum possible number or use the maximum number suggested by the terminal (250,000).
Max bars in chart – This parameter sets the number of bars displayed on the open price chart. The system’s performance depends on this value. For example, if you open many windows with the maximum value for Max bars in chart, it will increase the load on the processor and may cause the terminal to lag. Adjust this parameter based on your system’s capabilities. Typically, 50,000 is sufficient, but you can reduce it to 20,000 or slightly less if you have a large number of charts open simultaneously.


2 – By pressing and holding the ‘Home’ key on your keyboard. You will see the number of available bars increase in real-time. Once the required number of bars is reached, switch the timeframe and then switch back to refresh the indicator calculations.
If for some reason you are unable to load historical data using the ‘Home’ button (second method), please use the History Center.
However, we have still provided the option to disable this check if you know what you’re doing and the existing minimum amount of historical data is sufficient for you and the trading strategy you are using.
See more in the video:

Use Forced Update / VPS Mode
Based on your feedback and reports, we have noticed unusual behavior of the indicator when it is installed on a VPS. It appears as overlapping signals. This issue is “floating,” meaning it may sometimes occur when the indicator is installed on a VPS, and sometimes it may not. It is possibly due to packet loss on the server, resulting in frequent reinitialization of the indicator, which interprets this as a restart but does not have time to process the “disconnect.” The technical details are not as important. What matters is that if you experience this issue, we recommend enabling the ‘Use Forced Update / VPS Mode‘ setting to ‘true.’
However, we want to point out that in the vast majority of cases, you will not need this feature, so it is disabled by default (‘false’).

Show Debug Info
The next function is a service feature designed to help identify any technical problems or quickly understand what might be misconfigured for the user. Essentially, it is meant to speed up problem-solving without the need for lengthy text exchanges, as a single screenshot can often provide the answer to what and why something might not be working.
When you activate this feature, you will see a message on the screen that looks something like this:
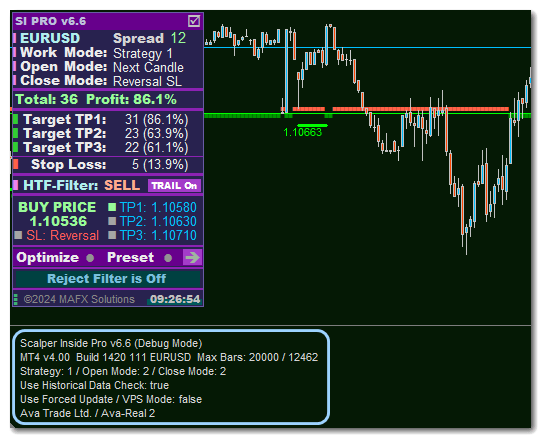
Please save a screenshot and send it along with a description of the problem by private message or to a contact email address.
—
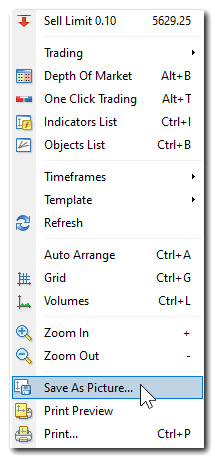
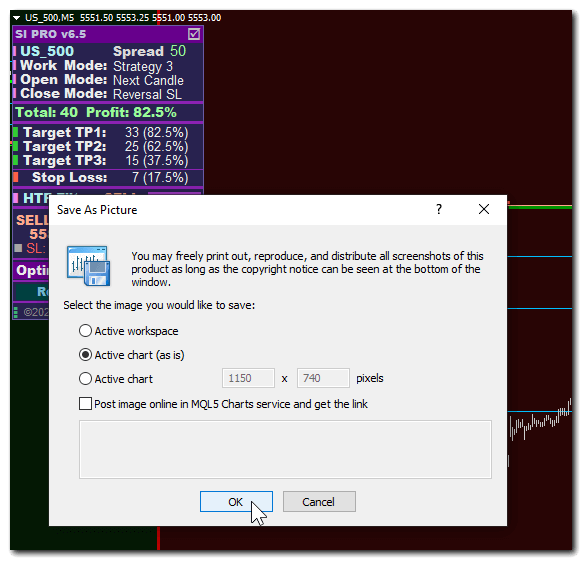
How to take a full screenshot of the chart:
Right-click on the chart, then select “Save as Picture…“:
We kindly ask that if you encounter any technical issues or have any questions, or if something isn’t working, please send us a direct message or an email.
And please attach a screenshot taken in Debug Mode, along with any other screenshots that clearly illustrate the problem. This will greatly help us resolve issues more quickly. Thank you very much for your understanding!


Link to the Complete and Updated Article
🍀 Good Luck & Big Profits
[ad_2]
لینک منبع : هوشمند نیوز
 آموزش مجازی مدیریت عالی حرفه ای کسب و کار Post DBA آموزش مجازی مدیریت عالی حرفه ای کسب و کار Post DBA+ مدرک معتبر قابل ترجمه رسمی با مهر دادگستری و وزارت امور خارجه |  آموزش مجازی مدیریت عالی و حرفه ای کسب و کار DBA آموزش مجازی مدیریت عالی و حرفه ای کسب و کار DBA+ مدرک معتبر قابل ترجمه رسمی با مهر دادگستری و وزارت امور خارجه |  آموزش مجازی مدیریت کسب و کار MBA آموزش مجازی مدیریت کسب و کار MBA+ مدرک معتبر قابل ترجمه رسمی با مهر دادگستری و وزارت امور خارجه |
 مدیریت حرفه ای کافی شاپ |  حقوقدان خبره |  سرآشپز حرفه ای |
 آموزش مجازی تعمیرات موبایل آموزش مجازی تعمیرات موبایل |  آموزش مجازی ICDL مهارت های رایانه کار درجه یک و دو |  آموزش مجازی کارشناس معاملات املاک_ مشاور املاک آموزش مجازی کارشناس معاملات املاک_ مشاور املاک |
برچسب ها :forexindicator ، Intraday ، Mastering ، Pro ، Scalper ، ScalperInsidePro ، Scalping ، ScalpingIndicators ، September ، Strategies ، Trading ، tradingstrategies ، v6.5
- نظرات ارسال شده توسط شما، پس از تایید توسط مدیران سایت منتشر خواهد شد.
- نظراتی که حاوی تهمت یا افترا باشد منتشر نخواهد شد.
- نظراتی که به غیر از زبان فارسی یا غیر مرتبط با خبر باشد منتشر نخواهد شد.


ارسال نظر شما
مجموع نظرات : 0 در انتظار بررسی : 0 انتشار یافته : 0